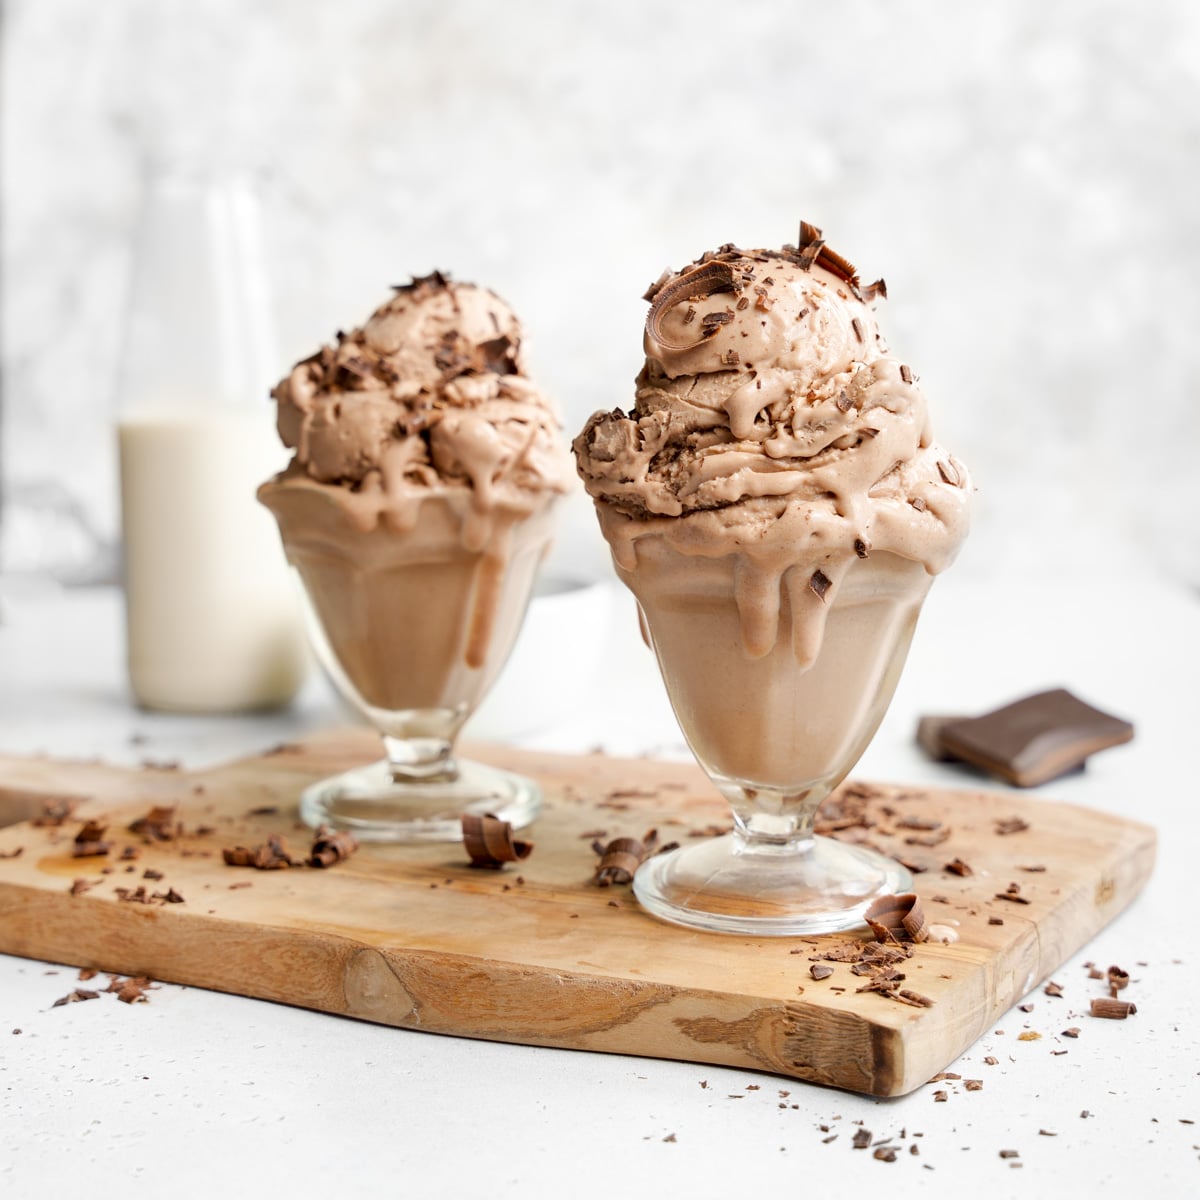
Indulge Guilt-Free: The Ultimate Homemade Vegan Chocolate Protein Ice Cream
Craving a rich, creamy, and satisfying dessert that also supports your health goals? Look no further! This homemade chocolate protein ice cream recipe is the answer to your sweet tooth and your body's nutritional needs. It's a truly revolutionary treat, proving that healthy can be incredibly delicious. Forget store-bought pints laden with artificial ingredients, excess sugar, and dairy; this plant-based delight is made with wholesome, simple ingredients and is completely vegan, gluten-free, and refined sugar-free. Get ready to scoop into a dessert that tastes like an indulgence but serves as a smart, protein-packed choice.
Why Homemade Vegan Chocolate Protein Ice Cream is Your New Favorite Treat
In a world full of highly processed snacks, finding a dessert that aligns with a clean eating lifestyle can feel like a challenge. That's where homemade vegan chocolate protein ice cream shines. It's not just another healthy recipe; it's a game-changer:
- Unrivaled Nutritional Value: Unlike traditional ice cream, which can be high in saturated fats and refined sugars, this recipe utilizes natural sweeteners and healthy fats. The addition of vegan protein powder transforms it from a mere dessert into a functional food, perfect for post-workout recovery or a satisfying protein boost any time of day.
- Clean & Simple Ingredients: You'll know exactly what goes into your bowl. This recipe champions whole foods, free from artificial preservatives, flavors, and emulsifiers commonly found in commercial ice creams.
- Dietary Inclusivity: Whether you're vegan, gluten-sensitive, trying to reduce refined sugar intake, or simply seeking healthier alternatives, this recipe ticks all the boxes. It's naturally dairy-free, oil-free, and kind to various dietary restrictions.
- Superior Taste & Texture: Many healthy ice creams compromise on flavor or creaminess. This recipe, however, is crafted to deliver a lusciously creamy texture and deep chocolate flavor that genuinely rivals traditional ice cream, making it an ultimate healthy treat.
- Cost-Effective: Making your own ice cream at home is often significantly cheaper than purchasing premium "healthy" or vegan ice cream brands from the store, allowing you to enjoy this delight more often.
Crafting Your Perfect Vegan Chocolate Protein Ice Cream Base
The secret to this incredible chocolate protein ice cream lies in its thoughtfully selected ingredients and simple preparation. Each component plays a crucial role in achieving that perfect taste and texture:
Essential Ingredients for a Silky Smooth Base:
- Medjool Dates: These aren't just for sweetness; Medjool dates provide natural caramel notes, fiber, and act as a binder, contributing to the ice cream's smooth consistency. Always opt for fresh, soft dates for the best results.
- Raw Cashews: The powerhouse behind the incredible creaminess! When properly soaked and blended, cashews create a rich, dairy-like base without any dairy. They also contribute healthy fats and a touch of protein.
- Lite Coconut Milk: While full-fat coconut milk is often used in vegan ice creams, lite coconut milk is chosen here to keep the dessert lower in fat and calories, making it more weight-loss-friendly without sacrificing creaminess. A crucial tip: Look for coconut milk that contains guar gum. This natural thickener is vital for preventing ingredient separation and promoting that desirable smooth, scoopable texture in your final ice cream.
- Vegan Protein Powder: This is where the "protein" in our chocolate protein ice cream comes from! Choose your favorite vegan protein powder – a pea protein blend, rice protein, or even a soy-based option works well. If your protein powder is chocolate flavored, it will naturally boost the cocoa notes. If unflavored, you'll rely more heavily on the cocoa powder.
- Unsweetened Cocoa or Cacao Powder: For that deep, rich chocolate flavor. Cacao powder offers a slightly more intense, earthy flavor and retains more nutrients as it's less processed. Dutch-processed cocoa powder will give a darker color and milder chocolate taste.
- Vanilla Extract: A splash of vanilla enhances and deepens the chocolate flavor, adding complexity to the overall taste profile.
- Pinch of Sea Salt: Don't skip this! A tiny bit of salt balances the sweetness and makes the chocolate flavor pop even more.
The Soaking Process: Your First Step to Perfection
The journey to creamy vegan ice cream begins with proper soaking. Combine your Medjool dates (pitted) and raw cashews in a bowl with 1 ¼ cups of filtered water. Place this in the fridge to soak for at least 4 hours, though overnight is truly best for optimal softness. This step is non-negotiable as it softens the cashews and dates, ensuring they blend into an incredibly silky-smooth base that won't have any gritty texture. If you plan to use a traditional ice cream maker, ensure its bowl is chilling in the freezer at this point.
Making it Creamy: Equipment Options & Techniques
One of the beauties of this homemade chocolate protein ice cream recipe is its versatility. You can achieve a fantastic result with various kitchen appliances:
1. High-Speed Blender (Initial Blend for All Methods)
Regardless of your final churning method, you'll start here. Once your cashews and dates are perfectly soft, add them along with their soaking water to a high-speed blender. Incorporate the remaining ingredients: lite coconut milk, vegan protein powder, cocoa powder, vanilla extract, and a pinch of salt. Blend on high until the mixture is utterly silky smooth, with no discernible chunks. This could take a few minutes, so be patient!
2. Traditional Ice Cream Maker (Recommended for Soft-Serve)
For those who love the classic ice cream maker experience and desire a soft-serve consistency right away, this is your go-to method.
- Ensure your ice cream maker bowl has been frozen solid for at least 24 hours.
- Pour the perfectly blended mixture into the ice cream machine.
- Churn for approximately 25-30 minutes. Churning time can vary based on your specific machine, so keep an eye on the consistency. You're looking for a thick, soft-serve texture.
- Enjoy immediately for a delightful soft serve, or transfer to an airtight container and freeze for a firmer, scoopable consistency.
3. Ninja Creami Machine (The Game-Changer for Protein Ice Cream)
The Ninja Creami Chocolate Protein Ice Cream method has revolutionized the way many people enjoy high-protein frozen treats. It creates an unbelievably creamy texture with minimal effort, making your homemade chocolate protein ice cream taste like a premium store-bought dessert.
- Pour the blended base into your Ninja Creami pint cup.
- Freeze the pint for a minimum of 24 hours, or until completely solid.
- The next day, place the frozen pint into the Ninja Creami machine. Select the "Light Ice Cream" or "Ice Cream" function.
- If the texture is powdery or crumbly after the first spin (which can happen with different protein powders or milks), simply add 1-2 tablespoons of unsweetened almond milk (or other plant milk) and use the "Respin" function. Boom! Perfect protein ice cream with little to no effort.
4. High-Speed Blender (No-Churn Method for a Blender-Only Approach)
No ice cream maker or Ninja Creami? No problem! You can still enjoy this healthy treat.
- Once your base is blended, pour the mixture into ice cream molds, silicone trays, or even a shallow, freezer-safe dish.
- Freeze overnight until completely solid.
- The next day, pop the frozen chunks (or scoop out the frozen base) and add them to your high-speed blender with a splash of unsweetened almond milk (start with 1/4 cup and add more only if needed).
- Blend on high, scraping down the sides as necessary, until a perfectly creamy, soft-serve consistency is achieved. You might need to pulse a few times to get it going.
Tips for the Ultimate Chocolate Protein Ice Cream Experience
Once you've made your delicious chocolate protein ice cream, here are some tips to enjoy it to the fullest and keep it perfect:
- Serving: While it can be enjoyed immediately as a soft serve, freezing it for an additional 1-2 hours after churning will yield a firmer, more scoopable texture. For a very hard consistency, let it freeze overnight. If it gets too hard, simply let it sit at room temperature for 10-15 minutes before attempting to scoop.
- Storage: Store any leftovers in an airtight container in the freezer for up to two weeks. This helps prevent freezer burn and maintains freshness.
- Creative Toppings: Elevate your dessert with healthy toppings! Consider fresh berries, cacao nibs for extra crunch, a drizzle of almond or peanut butter, a sprinkle of flaky sea salt (highly recommended to enhance chocolate!), or a dash of shredded coconut.
- Flavor Variations: Don't be afraid to experiment!
- Mint Chocolate Chip: Add 1/2-1 teaspoon of peppermint extract and fold in some vegan chocolate chips after churning.
- Peanut Butter Swirl: Swirl in some melted peanut butter or almond butter just before the final freeze.
- Coffee Mocha: Add 1-2 teaspoons of instant espresso powder or strong cold brew concentrate to the blender for a mocha twist.
- Nutty Crunch: Fold in chopped roasted nuts (like pecans or walnuts) or seeds for added texture.
- Troubleshooting Hard Ice Cream: If your ice cream freezes rock-solid (common with low-fat, low-sugar homemade versions), simply let it sit on the counter for 10-15 minutes before scooping. Alternatively, if you have a Ninja Creami, you can re-spin it, potentially with a splash of liquid.
This homemade chocolate protein ice cream isn't just a recipe; it's an invitation to rediscover the joy of healthy indulgence. It's my current favorite healthy treat to make because it's so incredibly easy and tastes indistinguishable from traditional, less healthy versions. Ditch the guilt, grab your blender, and get ready to enjoy a creamy, chocolatey dream that loves you back!
